Raise your hand if you sometimes let a distaste for messes get in the way of trying out fun activities… ✋✋✋ I place a very high value on creativity, so I always pictured myself as the kind of mom who would provide ample opportunities for artistic ideas to unfold. But in reality, I find that cleaning up little messes all day makes me feel less-than-excited about doing things that would create even bigger messes.
However, my artistic ways are winning over and I’m slowly letting go of the expectation that things should always be tidy and perfect. Now that my son is 2.5 years old and mostly through the eating-crayons phase, I figured we should start making art a part of our routine. I found something that worked perfectly for us, with easy clean-up and colorful results, so I thought I’d share.
The Perfect Low-Mess Painting Project for Little Artists

Materials:
- Paper- Any kind, really, but we used marker and watercolor paper.
- Washable Paint- I used Watercolor Magic, but any washable liquid paint would work.
- Paintbrushes
- Table covering- Protect your work surface using newspaper, an old tablecloth, cardboard, or a cut-up paper bag.
- Tape (optional)
- Stickers (optional)
- Smock or play clothes

Instructions:
- Prepare your work surface. Protect your table by laying down newspaper or whatever you have on hand. I used a paper grocery bag taped to the table, then taped the marker paper on top of that, which kept everything in place even if the art session got really active (which, of course, it did).
- If you like, you can put some stickers on the paper before painting to make your picture a little more fancy or create a scene.
- Give your child a paintbrush and explain how to use it to spread paint onto the paper. Drop some of the liquid paint onto the paper and let your child brush it around. Dropping the paint directly onto the paper kept things fairly neat, for us.
- Once you’ve painted with one color, allow your child to choose a different color. We kept going this way until my son declared his work of art complete.
- Cleanup is super easy for this project- just rinse the paint brushes and put away your supplies.

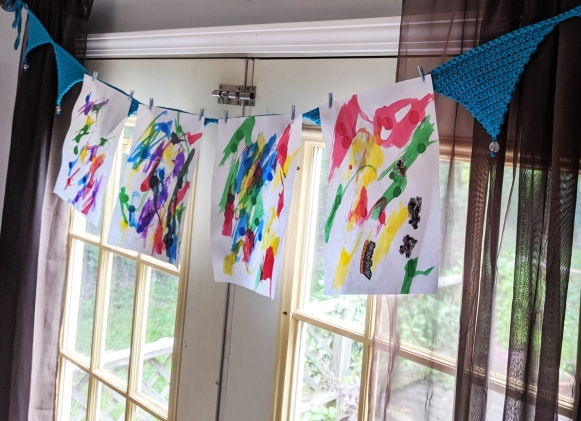
Allow the paint to dry, then proudly display your new artwork! These are great to give away to family because they are bright, cheerful, and quick to make. My little artist usually cranks out 3-5 paintings each time we do this.

Other Tips for Making Art with Littles:
- Rather than telling young kids what NOT to do, remind them of what they SHOULD be doing. A young child’s brain has not yet developed the ability to control impulses, so focus on the desired behavior and don’t give them any bad ideas. Instead of “Don’t paint on the table,” you might say, “Make sure the paint stays on the paper,” for example.
- If you have any white crayons laying around, you can add an extra step to this project by drawing some designs with white crayon before you begin painting. The crayon marks will resist the paint, leaving fun designs on your project. Older kids might even enjoy making secret messages!
- When using watercolor cakes with young children, buy a cheap set (Crayola makes some that are inexpensive but surprisingly vibrant, and I’ve also seen watercolors at the dollar store). Then don’t worry about the colors getting mixed up, and let your young artist go wild.
- If you can get your child to wear a smock- that’s awesome! My kid refuses. He will, however, let me slip an old T-shirt over his head with no problem. 😉
What kind of stress-free artsy things do you like to do with kids? I’d love to hear your ideas!


